Introduction to Git rebase and force-push all tiers
This guide helps you to get started with rebasing, force-pushing, and fixing merge conflicts locally.
Before diving into this document, make sure you are familiar with using Git through the command line.
Git rebase
Rebasing is a very common operation in Git, and has these options:
Before rebasing
git rebase rewrites the commit history. It can be harmful to do it in
shared branches. It can cause complex and hard to resolve
merge conflicts. In
these cases, instead of rebasing your branch against the default branch,
consider pulling it instead (git pull origin master). It has a similar
effect without compromising the work of your contributors.It’s safer to back up your branch before rebasing to make sure you don’t lose
any changes. For example, consider a feature branch
called my-feature-branch:
-
Open your feature branch in the terminal:
git checkout my-feature-branch -
Checkout a new branch from it:
git checkout -b my-feature-branch-backup -
Go back to your original branch:
git checkout my-feature-branch
Now you can safely rebase it. If anything goes wrong, you can recover your
changes by resetting my-feature-branch against my-feature-branch-backup:
-
Make sure you’re in the correct branch (
my-feature-branch):git checkout my-feature-branch -
Reset it against
my-feature-branch-backup:git reset --hard my-feature-branch-backup
If you added changes to my-feature-branch after creating the backup branch,
you lose them when resetting.
Regular rebase
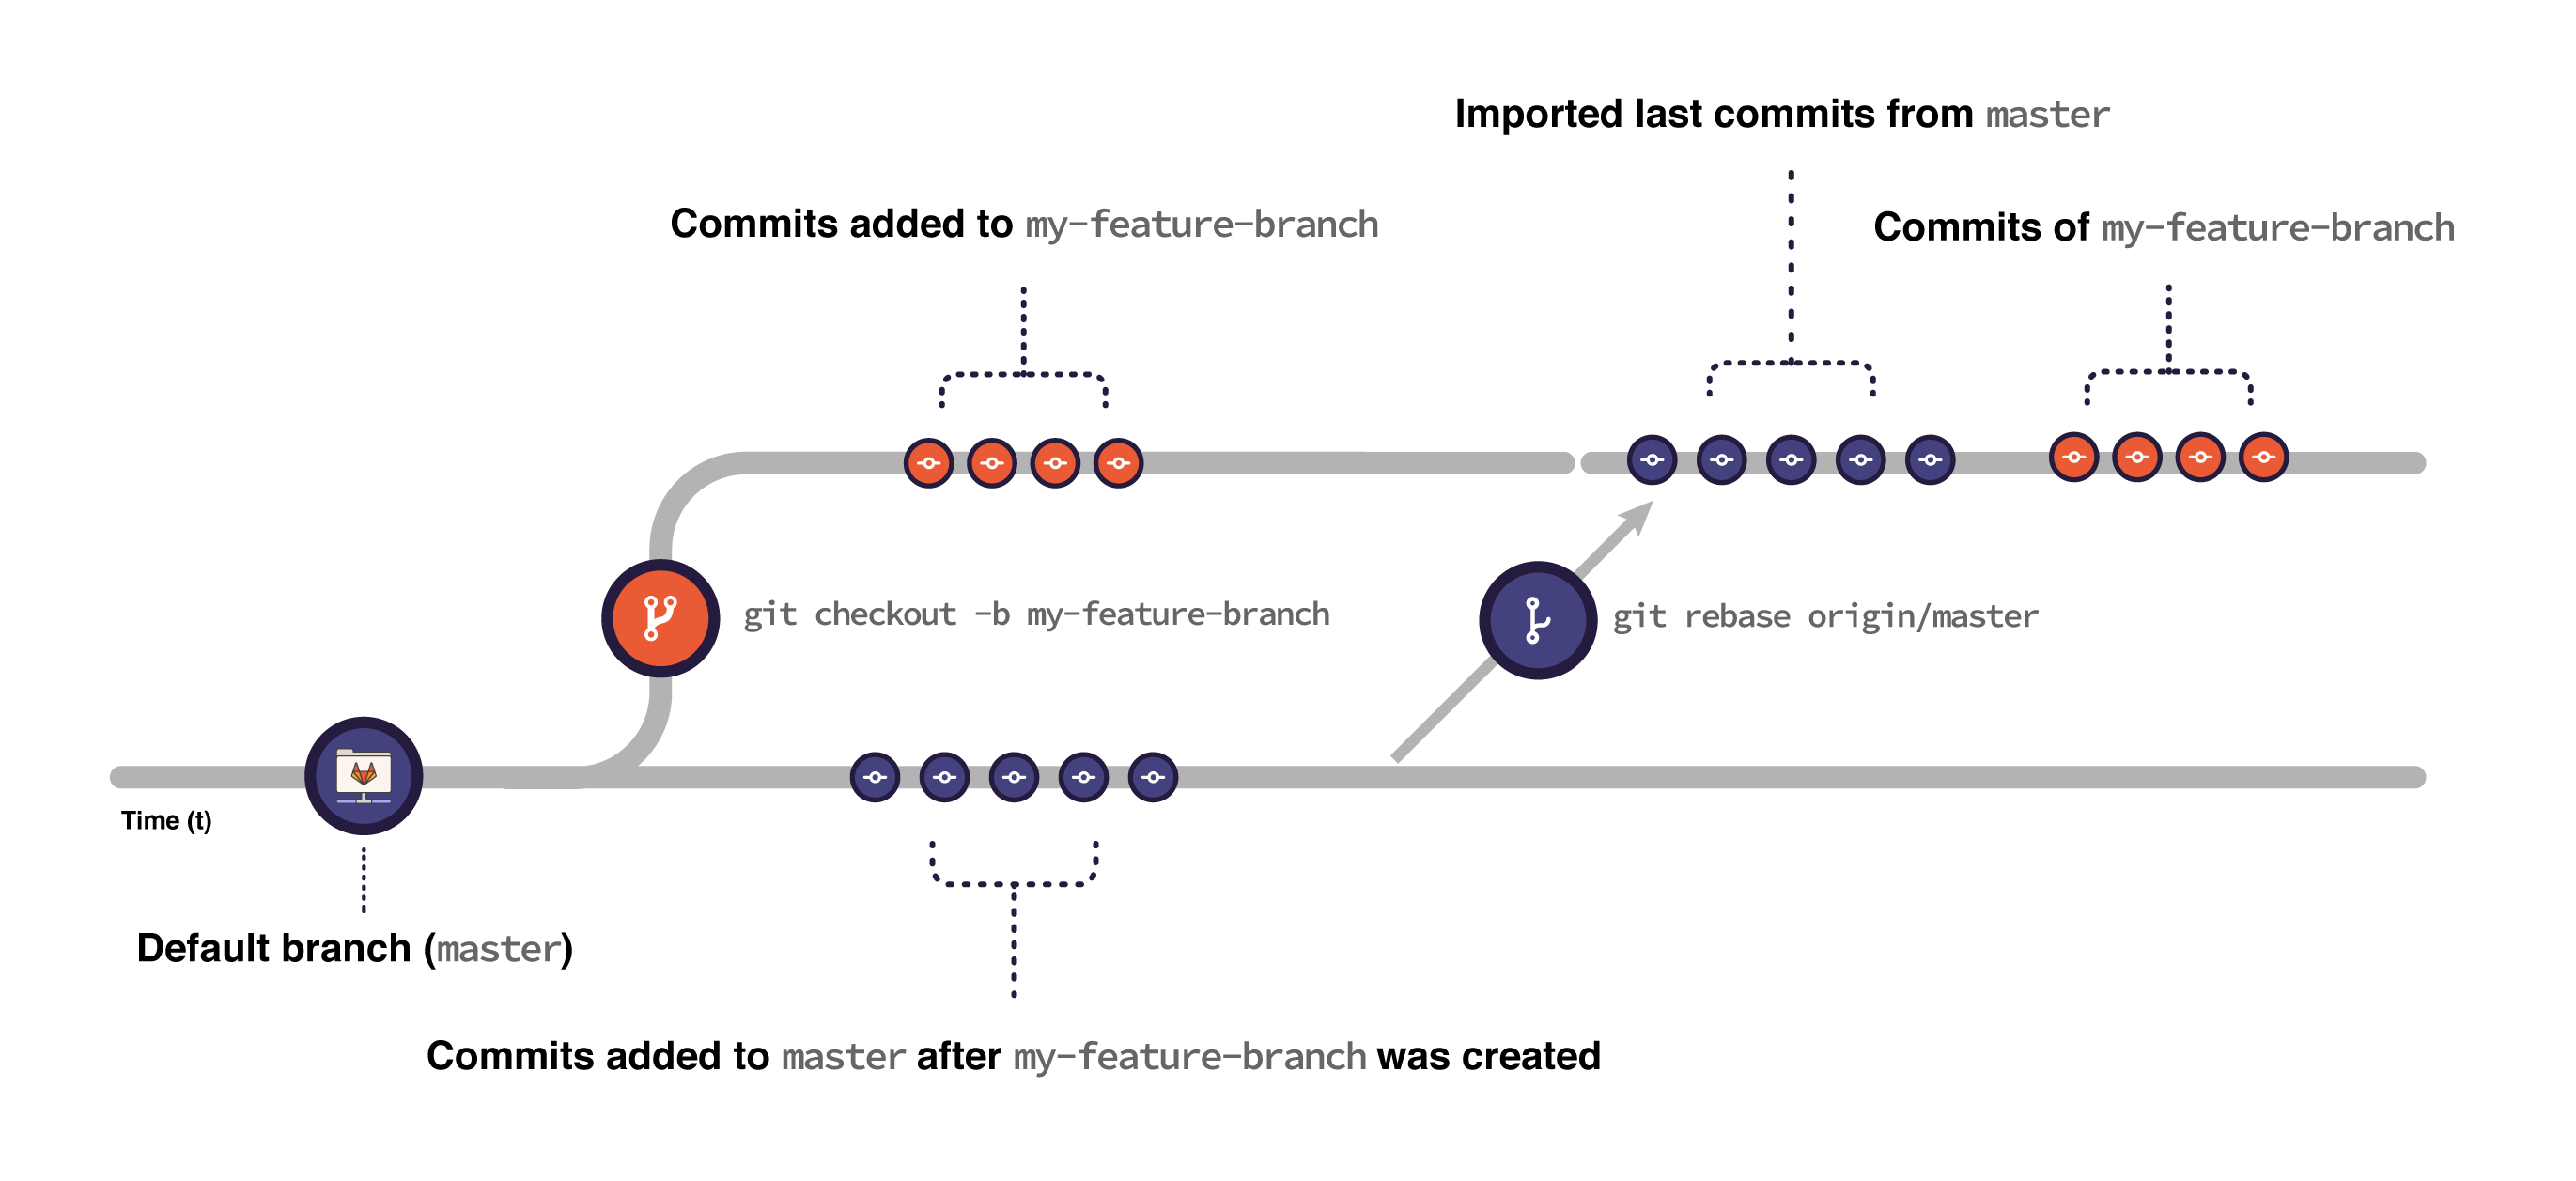
With a regular rebase you can update your feature branch with the default branch (or any other branch). This step is important for Git-based development strategies. You can ensure your new changes don’t break any existing changes added to the target branch after you created your feature branch.
For example, to update your branch my-feature-branch with your
default branch (here, using main):
-
Fetch the latest changes from
main:git fetch origin main -
Checkout your feature branch:
git checkout my-feature-branch -
Rebase it against
main:git rebase origin/main -
Force-push to your branch.
When you rebase:
- Git imports all the commits submitted to
mainafter the moment you created your feature branch until the present moment. - Git puts the commits you have in your feature branch on top of all
the commits imported from
main:
You can replace main with any other branch you want to rebase against, for
example, release-10-3. You can also replace origin with other remote
repositories, for example, upstream. To check what remotes you have linked to your local
repository, you can run git remote -v.
If there are merge conflicts, Git prompts you to fix them before continuing the rebase.
To learn more, check Git’s documentation on rebasing and rebasing strategies.
Rebase from the GitLab UI
You can rebase your feature branch directly from the merge request through a quick action, if all of these conditions are met:
- No merge conflicts exist for your feature branch.
- You have the Developer role for the source project. This role grants you permission to push to the source branch for the source project.
- If the merge request is in a fork, the fork must allow commits from members of the upstream project.
To rebase from the UI:
- Go to your merge request.
- Type
/rebasein a comment. - Select Comment.
GitLab schedules a rebase of the feature branch against the default branch and executes it as soon as possible.
The user performing the rebase action is considered a user that added commits to the merge request. When the merge request approvals setting Prevent approvals by users who add commits is enabled, the user can’t also approve the merge request.
Interactive rebase
You can use interactive rebase to modify commits. For example, amend a commit message, squash (join multiple commits into one), edit, or delete commits. Use a rebase for changing past commit messages, and organizing the commit history of your branch to keep it clean.
When you want to change anything in recent commits, use interactive
rebase by passing the flag --interactive (or -i) to the rebase command.
For example, if you want to edit the last three commits in your branch
(HEAD~3), run:
git rebase -i HEAD~3
Git opens the last three commits in your terminal text editor and describes
all the interactive rebase options you can use. The default option is pick,
which maintains the commit unchanged. Replace the keyword pick according to
the operation you want to perform in each commit. To do so, edit
the commits in your terminal’s text editor.
For example, with Vim as the text editor in
a macOS’s Zsh shell, you can squash or fixup (combine) all three commits:
- Press i on your keyboard to switch to Vim’s editing mode.
- Use your keyboard arrows to edit the second commit keyword
from
picktosquashorfixup(orsorf). Do the same to the third commit. The first commit should be left unchanged (pick) as we want to squash the second and third into the first. - Press Escape to leave the editing mode.
- Type
:wqto “write” (save) and “quit”. - When squashing, Git outputs the commit message so you have a chance to edit it:
- All lines starting with
#are ignored and not included in the commit message. Everything else is included. - To leave it as it is, type
:wq. To edit the commit message: switch to the editing mode, edit the commit message, and save it as you just did.
- All lines starting with
- If you haven’t pushed your commits to the remote branch before rebasing, push your changes normally. If you had pushed these commits already, force-push instead.
The steps for editing through the command line can be slightly different depending on your operating system and the shell you’re using.
See Numerous undo possibilities in Git for a deeper look into interactive rebase.
Force-push
When you perform more complex operations, for example, squash commits, reset or
rebase your branch, you must force an update to the remote branch.
These operations imply rewriting the commit history of the branch.
To force an update, pass the flag --force or -f to the push command. For
example:
git push --force origin my-feature-branch
Forcing an update is not recommended when you’re working on shared branches.
Alternatively, you can pass the flag --force-with-lease
instead, as it is safer. This flag preserves any new commits added to the remote
branch by other people:
git push --force-with-lease origin my-feature-branch
If the branch you want to force-push is protected, you can’t force push to it unless you either:
- Unprotect it.
- Allow force push to it.
Then you can force push and protect it again.