Comment templates All tiers All offerings
Version history
- GraphQL support introduced in GitLab 14.9 with a flag named
saved_replies. Disabled by default. - User interface introduced in GitLab 15.10 with a flag named
saved_replies. Disabled by default. Enabled for GitLab team members only. - Enabled on GitLab.com and self-managed in GitLab 16.0.
- Feature flag removed in GitLab 16.6.
With comment templates, create and reuse text for any text area in:
- Merge requests, including diffs.
- Issues, including design management comments.
- Epics.
- Work items.
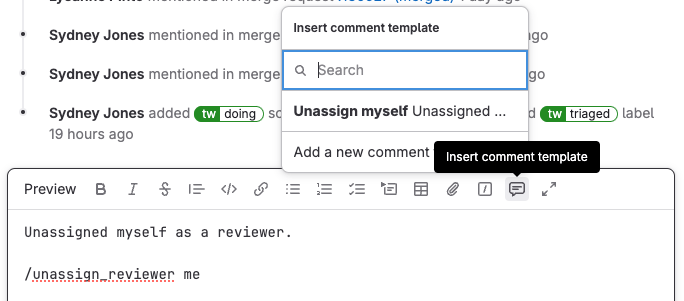
Comment templates can be small, like approving a merge request and unassigning yourself from it, or large, like chunks of boilerplate text you use frequently:
Use comment templates in a text area
To include the text of a comment template in your comment:
- In the editor toolbar for your comment, select Comment templates ().
- Select your desired comment template.
Create comment templates
To create a comment template for future use:
- On the left sidebar, select your avatar.
- From the dropdown list, select Preferences.
- On the left sidebar, select Comment templates ().
- Select Add new.
- Provide a Name for your comment template.
- Enter the Content of your reply. You can use any formatting you use in other GitLab text areas.
- Select Save, and the page reloads with your comment template shown.
View your comment templates
To go to your comment templates:
- On the left sidebar, select your avatar.
- From the dropdown list, select Preferences.
- On the left sidebar, select Comment templates ().
- Scroll to My comment templates.
Edit or delete comment templates
To edit or delete a previously comment template:
- On the left sidebar, select your avatar.
- From the dropdown list, select Preferences.
- On the left sidebar, select Comment templates ().
- Scroll to My comment templates, and identify the comment template you want to edit.
- To edit, select Edit ().
- To delete, select Delete (), then select Delete again on the dialog.
