Releases All tiers All offerings
In GitLab, a release enables you to create a snapshot of your project for your users, including installation packages and release notes. You can create a GitLab release on any branch. Creating a release also creates a Git tag to mark the release point in the source code.
A release can include:
- A snapshot of the source code of your repository.
- Generic packages created from job artifacts.
- Other metadata associated with a released version of your code.
- Release notes.
When you create a release:
- GitLab automatically archives source code and associates it with the release.
- GitLab automatically creates a JSON file that lists everything in the release, so you can compare and audit releases. This file is called release evidence.
When you create a release, or after, you can:
- Add release notes.
- Add a message for the Git tag associated with the release.
- Associate milestones with it.
- Attach release assets, like runbooks or packages.
View releases
To view a list of releases:
-
On the left sidebar, select Deploy > Releases, or
-
On the project’s overview page, if at least one release exists, select the number of releases.
- On public projects, this number is visible to all users.
- On private projects, this number is visible to users with at least the Reporter role.
Sort releases
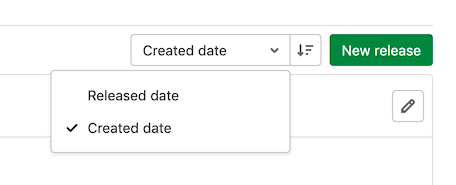
To sort releases by Released date or Created date, select from the sort order dropdown list. To switch between ascending or descending order, select Sort order.
Create a release
You can create a release:
You should create a release as one of the last steps in your CI/CD pipeline.
Create a release in the Releases page
Prerequisites:
- You must have at least the Developer role for a project. For more information, read Release permissions.
To create a release in the Releases page:
- On the left sidebar, select Search or go to and find your project.
- Select Deploy > Releases and select New release.
- From the Tag name dropdown list, either:
- Select an existing Git tag. Selecting an existing tag that is already associated with a release results in a validation error.
- Enter a new Git tag name.
- From the Create tag popover, select a branch or commit SHA to use when creating the new tag.
- Optional. In the Set tag message text box, enter a message to create an annotated tag.
- Select Save.
- Optional. Enter additional information about the release, including:
- Title.
- Milestones.
- Release notes.
- Whether or not to include the Tag message.
- Asset links.
- Select Create release.
Creating a release by using a CI/CD job
You can create a release directly as part of the GitLab CI/CD pipeline by using the
release keyword in the job definition.
The release is created only if the job processes without error. If the API returns an error during release creation, the release job fails.
Methods for creating a release using a CI/CD job include:
- Create a release when a Git tag is created.
- Create a release when a commit is merged to the default branch.
- Create release metadata in a custom script.
Use a custom SSL CA certificate authority
You can use the ADDITIONAL_CA_CERT_BUNDLE CI/CD variable to configure a custom SSL CA certificate authority,
which is used to verify the peer when the release-cli creates a release through the API using HTTPS with custom certificates.
The ADDITIONAL_CA_CERT_BUNDLE value should contain the
text representation of the X.509 PEM public-key certificate
or the path/to/file containing the certificate authority.
For example, to configure this value in the .gitlab-ci.yml file, use the following:
release:
  variables:
    ADDITIONAL_CA_CERT_BUNDLE: |
        -----BEGIN CERTIFICATE-----
        MIIGqTCCBJGgAwIBAgIQI7AVxxVwg2kch4d56XNdDjANBgkqhkiG9w0BAQsFADCB
        ...
        jWgmPqF3vUbZE0EyScetPJquRFRKIesyJuBFMAs=
        -----END CERTIFICATE-----
  script:
    - echo "Create release"
  release:
    name: 'My awesome release'
    tag_name: '$CI_COMMIT_TAG'
The ADDITIONAL_CA_CERT_BUNDLE value can also be configured as a
custom variable in the UI,
either as a file, which requires the path to the certificate, or as a variable,
which requires the text representation of the certificate.
Create multiple releases in a single pipeline
A pipeline can have multiple release jobs, for example:
ios-release:
  script:
    - echo "iOS release job"
  release:
    tag_name: v1.0.0-ios
    description: 'iOS release v1.0.0'

android-release:
  script:
    - echo "Android release job"
  release:
    tag_name: v1.0.0-android
    description: 'Android release v1.0.0'
Release assets as Generic packages
You can use Generic packages to host your release assets. For a complete example, see the Release assets as Generic packages project.
Upcoming releases
Introduced in GitLab 12.1.
You can create a release ahead of time by using the Releases API.
When you set a future released_at date, an Upcoming Release badge is displayed next to the
release tag. When the released_at date and time has passed, the badge is automatically removed.
Historical releases
Introduced in GitLab 15.2.
You can create a release in the past using either the
Releases API or the UI. When you set
a past released_at date, an Historical release badge is displayed next to
the release tag. Due to being released in the past, release evidence
is not available.
Edit a release
To edit the details of a release after it’s created, you can use the Update a release API or the UI.
Prerequisites:
- You must have at least the Developer role.
In the UI:
- On the left sidebar, select Deploy > Releases.
- In the upper-right corner of the release you want to modify, select Edit this release (the pencil icon).
- On the Edit Release page, change the release’s details.
- Select Save changes.
Delete a release
Introduced in GitLab 15.2
When you delete a release, its assets are also deleted. However, the associated Git tag is not deleted.
Prerequisites:
- You must have at least the Developer role. Read more about Release permissions.
To delete a release, use either the Delete a release API or the UI.
In the UI:
- On the left sidebar, select Search or go to and find your project.
- Select Deploy > Releases.
- In the upper-right corner of the release you want to delete, select Edit this release ().
- On the Edit Release page, select Delete.
- Select Delete release.
Associate milestones with a release
- Introduced in GitLab 12.5.
- Updated to edit milestones in the UI in GitLab 13.0.
You can associate a release with one or more project milestones.
GitLab Premium customers can specify group milestones to associate with a release.
You can do this in the user interface, or by including a milestones array in your request to
the Releases API.
In the user interface, to associate milestones to a release:
- On the left sidebar, select Deploy > Releases.
- In the upper-right corner of the release you want to modify, select Edit this release (the pencil icon).
- From the Milestones list, select each milestone you want to associate. You can select multiple milestones.
- Select Save changes.
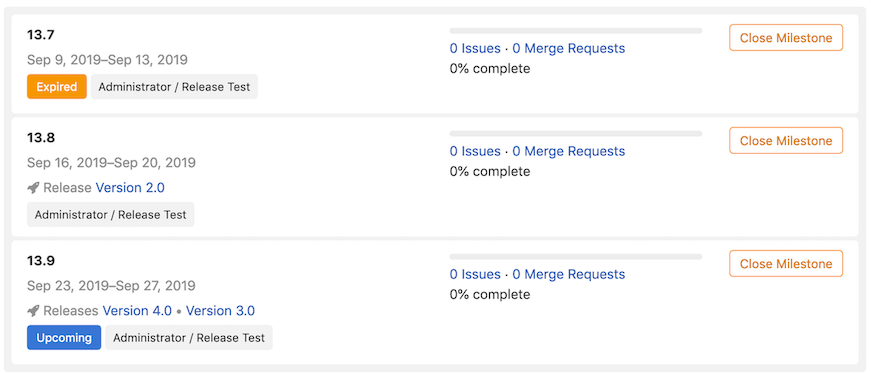
On the Deploy > Releases page, the Milestone is listed in the top section, along with statistics about the issues in the milestones.
Releases are also visible on the Plan > Milestones page, and when you select a milestone on this page.
Here is an example of milestones with no releases, one release, and two releases.
Get notified when a release is created
Introduced in GitLab 12.4.
You can be notified by email when a new release is created for your project.
To subscribe to notifications for releases:
- On the left sidebar, select Project overview.
- Select Notification setting (the bell icon).
- In the list, select Custom.
- Select the New release checkbox.
- Close the dialog box to save.
Prevent unintentional releases by setting a deploy freeze
- Introduced in GitLab 13.0.
- The ability to delete freeze periods through the UI was introduced in GitLab 14.3.
Prevent unintended production releases during a period of time you specify by setting a deploy freeze period. Deploy freezes help reduce uncertainty and risk when automating deployments.
A maintainer can set a deploy freeze window in the user interface or by using the Freeze Periods API to set a freeze_start and a freeze_end, which
are defined as crontab entries.
If the job that’s executing is in a freeze period, GitLab CI/CD creates an environment
variable named $CI_DEPLOY_FREEZE.
To prevent the deployment job from executing in multiple projects in a group,
define the .freezedeployment job in a file shared across the group.
Use the includes keyword to incorporate the
template in your project’s .gitlab-ci.yml file:
.freezedeployment:
  stage: deploy
  before_script:
    - '[[ ! -z "$CI_DEPLOY_FREEZE" ]] && echo "INFRASTRUCTURE OUTAGE WINDOW" && exit 1; '
  rules:
    - if: '$CI_DEPLOY_FREEZE'
      when: manual
      allow_failure: true
    - when: on_success
To prevent the deployment job from executing, use the extends keyword in the deploy_to_production job of your .gitlab-ci.yml file to inherit the configuration from the .freezedeployment template job:
deploy_to_production:
  extends: .freezedeployment
  script: deploy_to_prod.sh
  environment: production
This configuration blocks deployment jobs conditionally and maintains pipeline continuity. When a freeze period is defined, the job fails and the pipeline can proceed without deployment. Manual deployment is possible after the freeze period.
This approach offers deployment control during critical maintenance, and ensures the uninterrupted flow of the CI/CD pipeline.
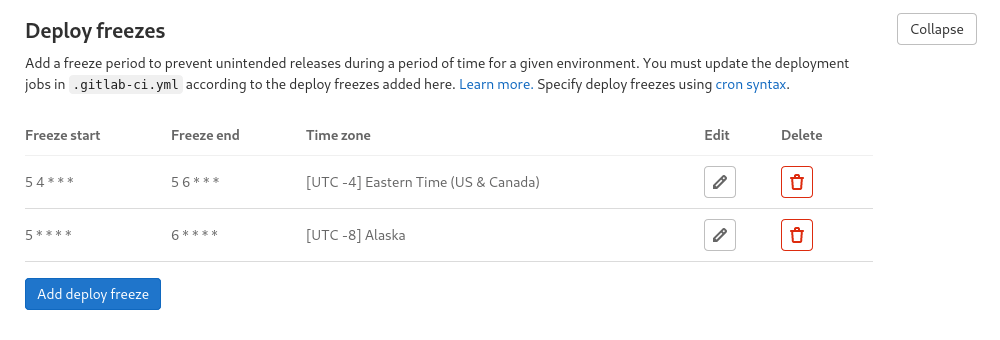
To set a deploy freeze window in the UI, complete these steps:
- Sign in to GitLab as a user with the Maintainer role.
- On the left sidebar, select Search or go to and find your project.
- Select Settings > CI/CD.
- Scroll to Deploy freezes.
- Select Expand to see the deploy freeze table.
- Select Add deploy freeze to open the deploy freeze modal.
- Enter the start time, end time, and time zone of the desired deploy freeze period.
- Select Add deploy freeze in the modal.
- After the deploy freeze is saved, you can edit it by selecting the edit button () and remove it by selecting the delete button ().

If a project contains multiple freeze periods, all periods apply. If they overlap, the freeze covers the complete overlapping period.
For more information, see Deployment safety.
Release permissions
Fixes to the permission model for create, update and delete actions were introduced in GitLab 14.1.
View a release and download assets
Changes to the Guest role were introduced in GitLab 14.5.
- Users with at least the Reporter role have read and download access to the project releases.
- Users with the Guest role have read and download access to the project releases. This includes associated Git-tag-names, release description, author information of the releases. However, other repository-related information, such as source code and release evidence are redacted.
Publish releases without giving access to source code
Introduced in GitLab 15.6.
Releases can be made accessible to non-project members while keeping repository-related information such as source code and release evidence private. Use this for projects that use releases as a way to give access to new versions of software but do not want the source code to be public.
To make releases available publicly, set the following project settings:
- Repository is enabled and set to Only Project Members
- Releases is enabled and set to Everyone With Access
Create, update, and delete a release and its assets
- Users with at least the Developer role have write access to the project releases and assets.
- If a release is associated with a protected tag, the user must be allowed to create the protected tag too.
As an example of release permission control, you can allow only
users with at least the Maintainer role
to create, update, and delete releases by protecting the tag with a wildcard (*),
and set Maintainer in the Allowed to create column.
Release Metrics Ultimate All offerings
Introduced in GitLab Premium 13.9.
Group-level release metrics are available by navigating to Group > Analytics > CI/CD. These metrics include:
- Total number of releases in the group
- Percentage of projects in the group that have at least one release
Working example project
The Guided Exploration project Utterly Automated Software and Artifact Versioning with GitVersion demonstrates:
- Using GitLab releases.
- Using the GitLab
release-cli. - Creating a generic package.
- Linking the package to the release.
- Using a tool called GitVersion to automatically determine and increment versions for complex repositories.
You can copy the example project to your own group or instance for testing. More details on what other GitLab CI patterns are demonstrated are available at the project page.
Troubleshooting
Getting 403 Forbidden or Something went wrong while creating a new release errors when creating, updating or deleting releases and their assets
If the release is associated with a protected tag, the UI/API request might result in an authorization failure. Make sure that the user or a service/bot account is allowed to create the protected tag too.
See the release permissions for more information.
Note about storage
This feature is built on top of Git tags, so virtually no extra data is needed besides to create the release itself. Additional assets and the release evidence that is automatically generated consume storage.


